Although Haruka can be installed via npm i discord-haruka, it’s not recommended, as Haruka isn’t a module. Instead, go to the GitHub repo and get a copy of Haruka’s latest release. In the root directory, open the file called .env.ex, and place your keys in there.
Place your super sensitive keys in here. Be mindful as to not add spaces around the equal sign. DISCORD_TOKEN is your bot’s login token which can be found in the Discord Developer portal. The second key, KANJI_ALIVE_KEY, is your X-Mashape-Key used for KanjiAlive, the API used to retrieve Kanji data. If you don’t wish to use the Kanji function, rename src/functions/kanji.coffee to src/functions/_kanji.coffee and rerun the build command. In a similar fashion, the WA_APPID key is Haruka’s WolframAlpha AppID, which can be found here. You can disable this function similarly to disabling the Kanji function.
The HARUKA_OPS key is a comma-separated list of IDs of users who can run the -h halt command. Add your User ID to the list. If adding multiple people, please separate them with commas WITHOUT any surrounding spaces. The HARUKA_LOG_GUILD_ID and HARUKA_LOG_CHANNEL_ID are for collecting function usage statistics. Haruka will send basic information about the command called in this guild and channel. If you do not wish to gather usage statistics, you may omit these fields.
Finally, rename .env.ex to simply .env. Run npm install to install Haruka’s dependencies, and run her locally by using npm start.
Contributing
First of all, get to know how Haruka works. Haruka is made of several component parts, and understanding how they work will ease development. Install Haruka as mentioned above, create a fork with your changes, and issue a Pull Request. Haruka’s written in CoffeeScript, you can build her by running npm build or npm watch in the root directory with CoffeeScript installed (devDependency). It’s also recommended you have a CoffeeScript linter installed.
Laravel Newsletter is an open source project that can be used for sending newsletters to multiple subscribers, mailing lists, … at once. This project can be used together with free mailing applications such as MailGun.
Installation
Step 1
First of all you need to clone the repository and install it using composer.
git clone git@github.com:NathanGeerinck/laravel-newsletter.git
cd laravel-newsletter && composer install
php artisan laravel-newsletter:install
npm run production
Step 2
Then you need to create a database and fill out the credentials in the .env file. An example:
Once you’ve created the database you can migrate all the tables into your database by running:
php artisan migrate
If you want to import the demo data then you can run:
php artisan laravel-newsletter:demo
Step 3
For sending emails you need to fillout your mail credentials.. You can use a service like Mailgun. You can adjust these settings also in the .env file.
This CCU-Addon reads an ics file from the given url. In the configuration you can define which meeting are represented as system variables within the HomeMatic CCU environment. If a defined meeting is running this is represented by the value of the corresponding system variable.
Additionally there are variables -TODAY and -TOMORROW which are set to active if a meeting is planned today or tommorow, even if the meeting only last for e.g. an hour.
Important: This addon is based on wget. On your CCU there might be an outdated version of wget, which might not support TLS 1.1 or TLS 1.2.
Modify configuration according to comments in config file:
vim hm_caldav.conf
Execute hm_caldav manually:
/opt/hm_caldav/hm_caldav.sh
If you want to automatically start hm_caldav on system startup a startup script
Using ‘system.Exec()’
Instead of automatically calling hm_caldav on a predefined interval one can also trigger its execution using the system.Exec() command within HomeMatic scripts on the CCU following the following syntax:
Please note the <iterations> and <waittime> which allows to additionally specify how many times hm_caldav should be executed with a certain amount of wait time in between. One example of such an execution can be:
Analyzing the performance of my custom built PC using a variety of gaming and synthetic benchmarks.
Compiling Data
I measured several variables as I tested my computer (such as but not limited to GPU/CPU temperature, power draw, utilization, and clock speed) to see if my PC was performing as I’d expect for the components I bought. In addition, getting a baseline performance analysis of my computer will help me in the future if something starts to act up on my computer. For example, I’ll have a good idea when my the thermal compound on my CPU cooler needs to be replaced once the CPU starts going significantly above the baseline temperature I measured while all the components were new.
The two programs I used to measure these variables were Nvidia’s Frameview and HWiNFO64 which saved the data as CSV’s that I could then import into R.
In the case of frameview, the program created a new CSV file for every game tested with the name of the game being included in the CSV’s file name. So, instead of manually compiling each of the separate game files together I built a python program called “Organize Excel” to automatically sort through all the CSV files in the frame view folder and combine them together as individual sheets within a single excel file for easy analysis in R.
I compiled all the data I collected into line and bar graphs using ggplot2 in R.
Gaming Benchmarks
My current test suit of games includes: GTAV, Overwatch, Rainbow Six Siege, Apex Legends, Destiny 2, Rocket League, Battlefront 2, Halo Infinite, Fortnite, and Call of Duty: Warzone. For each game I examined the following variables as I ran my benchmark: Frametime, GPU and CPU temperature, GPU and CPU utilization, GPU and CPU clock speed, GPU and CPU power consumption, Fan speed for CPU & GPU coolers, fan speed for the case fans, and Average FPS, 1% low FPS, and .1% low FPS. Analysis and graphs made for the gaming test suite was this was done in the “neat_game” program.
For all the variables above except Average FPS, 1% low FPS, and .1% low FPS each game was tested one time. For the Average FPS, 1% low FPS, and .1% low FPS I tested each game three times and then averaged the results together to get a more accurate measure of real world FPS while playing games.
Synthetic Benchmarks
The synthetic benchmarks I tested with are 3D Mark’s Timespy and Fire Strike Extreme, Heaven, and Cinebench R23. I tested the same variables with the synthetic benchmarks as I did with games except I did not measure frametime or any FPS measure. Analysis and graphs made for synthetic benchmarks test suite was this was done in the “neat_synthetic” program.
Sorting Graphs by Name
Once all the graphs from the “neat_game” and “neat_synthetic” programs were made and automatically saved into their specific “unsorted” folders, I used built a python program called “Graph File Organization” to sort each graph into relevant folders designated by the specific game/synthetic benchmark name.
More Information
For more information on the configuration and specifications of my computer please see the document titled “Computer info -July 1 Tests.docx”.
“Problems are opportunities in disguise.” – Charles F. Kettering
This documentation outlines the API endpoints for the SMS Gateway application. It details each endpoint’s functionality, request/response structure, and example use cases.
Overview
Base URL
The base URL serves as the entry point for all API requests: {{base_url}}
Example: https://localhost:8080/
Endpoints
1. Retrieve SMS Messages
Description
This endpoint retrieves all SMS messages stored on the server.
Request
Method:GET
URL:{{base_url}}/sms
Headers: None required
Query Parameters
You can optionally include query parameters to filter results:
phone_number (optional): Filter messages by the associated phone number.
Example Request
GET https://localhost:8080/sms
Response
Status Code:200 OK
Body: JSON array containing SMS records
Postman Test Code
pm.test("Status code is 200",function(){pm.response.to.have.status(200);});
2. Send an SMS
Description
This endpoint allows you to send an SMS by providing a recipient’s phone number and a message in the request body.
Request
Method:POST
URL:{{base_url}}/sms
Headers:
Content-Type: application/json
Body: JSON object
{
    "number": "+1234567890",
    "message": "Hello, this is a test message!"
}
Example Request
POST https://localhost:8080/smsContent-Type: application/json
{
"number": "+1234567890",
"message": "Hello, this is a test message!"
}
Response
Status Code:
200 OK or
201 Created
Body: JSON confirmation of the message sent
Postman Test Code
pm.test("Successful POST request",function(){pm.expect(pm.response.code).to.be.oneOf([200,201]);});
3. Delete an SMS
Description
This endpoint deletes a specific SMS record by its unique identifier (id).
Request
Method:DELETE
URL:{{base_url}}/sms/:id (Replace :id with the actual SMS ID)
NOTE –
Alerts are not dismissed by tapping the blurry background
Examples
The following example illustrates how you can create a loading indicator for your entire app.
If you’re using redux you may have a part of your store which says whether you’re loading something,
you can get that flag and show one of the loading indicators offered by this lib.
GANs and TimeGANs, Diffusions, LLM for tabular data
Generative Networks are well-known for their success in realistic image generation. However, they can also be applied to generate tabular data. This library introduces major improvements for generating high-fidelity tabular data by offering a diverse suite of cutting-edge models, including Generative Adversarial Networks (GANs), specialized TimeGANs for time-series data, Denoising Diffusion Probabilistic Models (DDPM), and Large Language Model (LLM) based approaches. These enhancements allow for robust data generation across various dataset complexities and distributions, giving an opportunity to try GANs, TimeGANs, Diffusions, and LLMs for tabular data generation.
To generate new data to train by sampling and then filtering by adversarial training
call GANGenerator().generate_data_pipe.
Data Format
TabGAN accepts data as a numpy.ndarray or pandas.DataFrame with columns categorized as:
Continuous Columns: Numerical columns with any possible value.
Discrete Columns: Columns with a limited set of values (e.g., categorical data).
Note: TabGAN does not differentiate between floats and integers, so all values are treated as floats. For integer requirements, round the output outside of TabGAN.
Sampler Parameters
All samplers (OriginalGenerator, GANGenerator, ForestDiffusionGenerator, LLMGenerator) share the following input parameters:
gen_x_times: float (default: 1.1) – How much data to generate. The output might be less due to postprocessing and adversarial filtering.
cat_cols: list (default: None) – A list of column names to be treated as categorical.
bot_filter_quantile: float (default: 0.001) – The bottom quantile for postprocess filtering. Values below this quantile will be filtered out.
top_filter_quantile: float (default: 0.999) – The top quantile for postprocess filtering. Values above this quantile will be filtered out.
is_post_process: bool (default: True) – Whether to perform post-filtering. If False, bot_filter_quantile and top_filter_quantile are ignored.
adversarial_model_params: dict (default: see below) – Parameters for the adversarial filtering model. Default values are optimized for binary classification tasks.
pregeneration_frac: float (default: 2) – For the generation step, gen_x_times * pregeneration_frac amount of data will be generated. However, after postprocessing, the aim is to return an amount of data equivalent to (1 + gen_x_times) times the size of the original dataset (if only_generated_data is False, otherwise gen_x_times times the size of the original dataset).
only_generated_data: bool (default: False) – If True, only the newly generated data is returned, without concatenating the input training dataframe.
gen_params: dict (default: see below) – Parameters for the underlying generative model training. Specific to GANGenerator and LLMGenerator.
GANGenerator: Utilizes the Conditional Tabular GAN (CTGAN) architecture, known for effectively modeling tabular data distributions and handling mixed data types (continuous and discrete). It learns the data distribution and generates synthetic samples that mimic the original data.
ForestDiffusionGenerator: Implements a novel approach using diffusion models guided by tree-based methods (Forest Diffusion). This technique is capable of generating high-quality synthetic data, particularly for complex tabular structures, by gradually adding noise to data and then learning to reverse the process.
LLMGenerator: Leverages Large Language Models (LLMs) using the GReaT (Generative Realistic Tabular data) framework. It transforms tabular data into a text format, fine-tunes an LLM on this representation, and then uses the LLM to generate new tabular instances by sampling from it. This approach is particularly promising for capturing complex dependencies and can generate diverse synthetic data.
OriginalGenerator: Acts as a baseline sampler. It typically returns the original training data or a direct sample from it. This is useful for comparison purposes to evaluate the effectiveness of more complex generative models.
generate_data_pipe Method Parameters
The generate_data_pipe method, available for all samplers, uses the following parameters:
train_df: pd.DataFrame – The training dataframe (features only, without the target variable).
target: pd.DataFrame – The input target variable for the training dataset.
test_df: pd.DataFrame – The test dataframe. The newly generated training dataframe should be statistically similar to this.
deep_copy: bool (default: True) – Whether to make a copy of the input dataframes. If False, input dataframes will be modified in place.
only_adversarial: bool (default: False) – If True, only adversarial filtering will be performed on the training dataframe; no new data will be generated.
use_adversarial: bool (default: True) – Whether to perform adversarial filtering.
@return: Tuple[pd.DataFrame, pd.DataFrame] – A tuple containing the newly generated/processed training dataframe and the corresponding target.
Advanced Usage: Generating Time-Series Data with TimeGAN
You can easily adjust the code to generate multidimensional time-series data. This approach primarily involves extracting day, month, and year components from a date column to be used as features in the generation process. Below is a demonstration:
Run experiments using python ./Research/run_experiment.py. You may
add more datasets, adjust validation type, and categorical encoders.
Observe metrics across all experiments in the console or in ./Research/results/fit_predict_scores.txt.
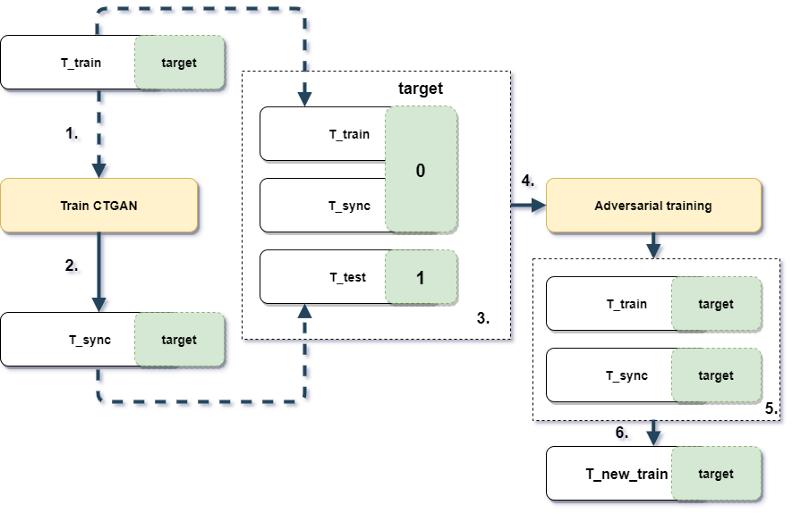
Experiment design
Picture 1.1 Experiment design and workflow
Results
The table below (Table 1.2) shows ROC AUC scores for different sampling strategies. To facilitate comparison across datasets with potentially different baseline AUC scores, the ROC AUC scores for each dataset were scaled using min-max normalization (where the maximum score achieved by any method on that dataset becomes 1, and the minimum becomes 0). These scaled scores were then averaged across all datasets for each sampling strategy. Therefore, a higher value in the table indicates better relative performance in generating data that is difficult for a classifier to distinguish from the original data, when compared to other methods on the same set of datasets.
Table 1.2 Averaged Min-Max Scaled ROC AUC scores for different sampling strategies across datasets. Higher is better (closer to 1 indicates performance similar to the best method on each dataset).
dataset_name
None
gan
sample_original
credit
0.997
0.998
0.997
employee
0.986
0.966
0.972
mortgages
0.984
0.964
0.988
poverty_A
0.937
0.950
0.933
taxi
0.966
0.938
0.987
adult
0.995
0.967
0.998
Citation
If you use tabgan in a scientific publication, we would appreciate references to the following BibTex entry:
arxiv publication:
[1] Xu, L., & Veeramachaneni, K. (2018). Synthesizing Tabular Data using Generative Adversarial Networks. arXiv:1811.11264 [cs.LG].
[2] Jolicoeur-Martineau, A., Fatras, K., & Kachman, T. (2023). Generating and Imputing Tabular Data via Diffusion and Flow-based Gradient-Boosted Trees. Retrieved from https://github.com/SamsungSAILMontreal/ForestDiffusion.
[3] Xu, L., Skoularidou, M., Cuesta-Infante, A., & Veeramachaneni, K. (2019). Modeling Tabular data using Conditional GAN. NeurIPS.
[4] Borisov, V., Sessler, K., Leemann, T., Pawelczyk, M., & Kasneci, G. (2023). Language Models are Realistic Tabular Data Generators. ICLR.
NO LONGER WORKS DUE TO BOT DETECTION. COULD BE USED AS A TEMPLATE FOR OTHER RESOURCES.
Termin-Bot
Idea
Termin (eng. appointment) is essential in Germany, especially in Berlin.
Sometimes it is tough to get a termin in public institutions and
this bot is a way to automate termin check and
send Telegram notification, if free
termin was found.
The code could be also considered as a template for subsequent development.
Getting Started
The principle of bot operation is to refresh a webpage with needed appointments periodically
[TERMIN_URL] and to recognize the change on it. E.g., the page always contains
the phrase “No free appointments” [NO_TERMIN_FOUND_STRING].
Then some free appointments are added to the system,
and the phrase “No free appointments” disappears. There is a new phrase
(e.g., “List of free appointments” [TERMIN_FOUND_STRING]) instead of the old one.
Bot recognizes the change on the webpage and sends Telegram notifications about free appointments.
To first use the program, you must create a properties file for termin-bot.
There is an example: src/main/resources/global.properties.
Here is a list of the properties:
BOT_NAME – The name of the bot. Used only in the log output.
BOT_PORT – The port which the chrome driver uses to check termin webpage.
BOT_TOKEN – Unique telegram bot token. You can get it after the creation of the telegram bot.
Use BotFather to create a bot. If you want to start the program without
telegram notifications, please start with the default value from the example properties file.
USERS – List of usernames from Telegram who get access to the bot. It could be ignored,
if you test the program without Telegram notifications.
CHAT_IDS – Telegram chat id, which is generated after the user sends the first message to the bot. Leave this field empty. It will be filled in automatically.
TERMIN_URL – The link to a website with appointments. This termin-bot was tested with the following website: https://otv.verwalt-berlin.de/ams/TerminBuchen
If you use it for the same resource, paste the link with the needed Visa type.
TERMIN_FOUND_STRING – The webpage’s phrase complies with free appointments.
An example is provided for otv.verwalt-berlin.de.
NO_TERMIN_FOUND_STRING – The webpage’s phrase complies with the absence of free appointments.
An example is provided for otv.verwalt-berlin.de
BUTTON_ID – The button which should be clicked to get a page with appointments.
An example is provided for otv.verwalt-berlin.de
How to use
Startup
After editing the properties file you can build this java program with Maven or use
released version.
You need Java 11 to run it.
To start the bot, run jar file with a path to the properties file as an argument.
Before the building of docker image be sure that the jar-with-dependencies is present after maven build in target folder. If you have problems with the build, create target folder in the project root directory and paste the released
version of jar file.
By default, for docker image is used the properties from src/main/resources/global.properties. If you want to change
it, edit src/main/docker/Dockerfile
Hardcode CHAT_IDS in properties file or use Docker volumes.
After container restart all editions of properties file will be deleted.
Deploy on Heroku
If you want to host this bot, you can use Heroku.
It is easy to host Docker containers there. You need only heroku.yml.